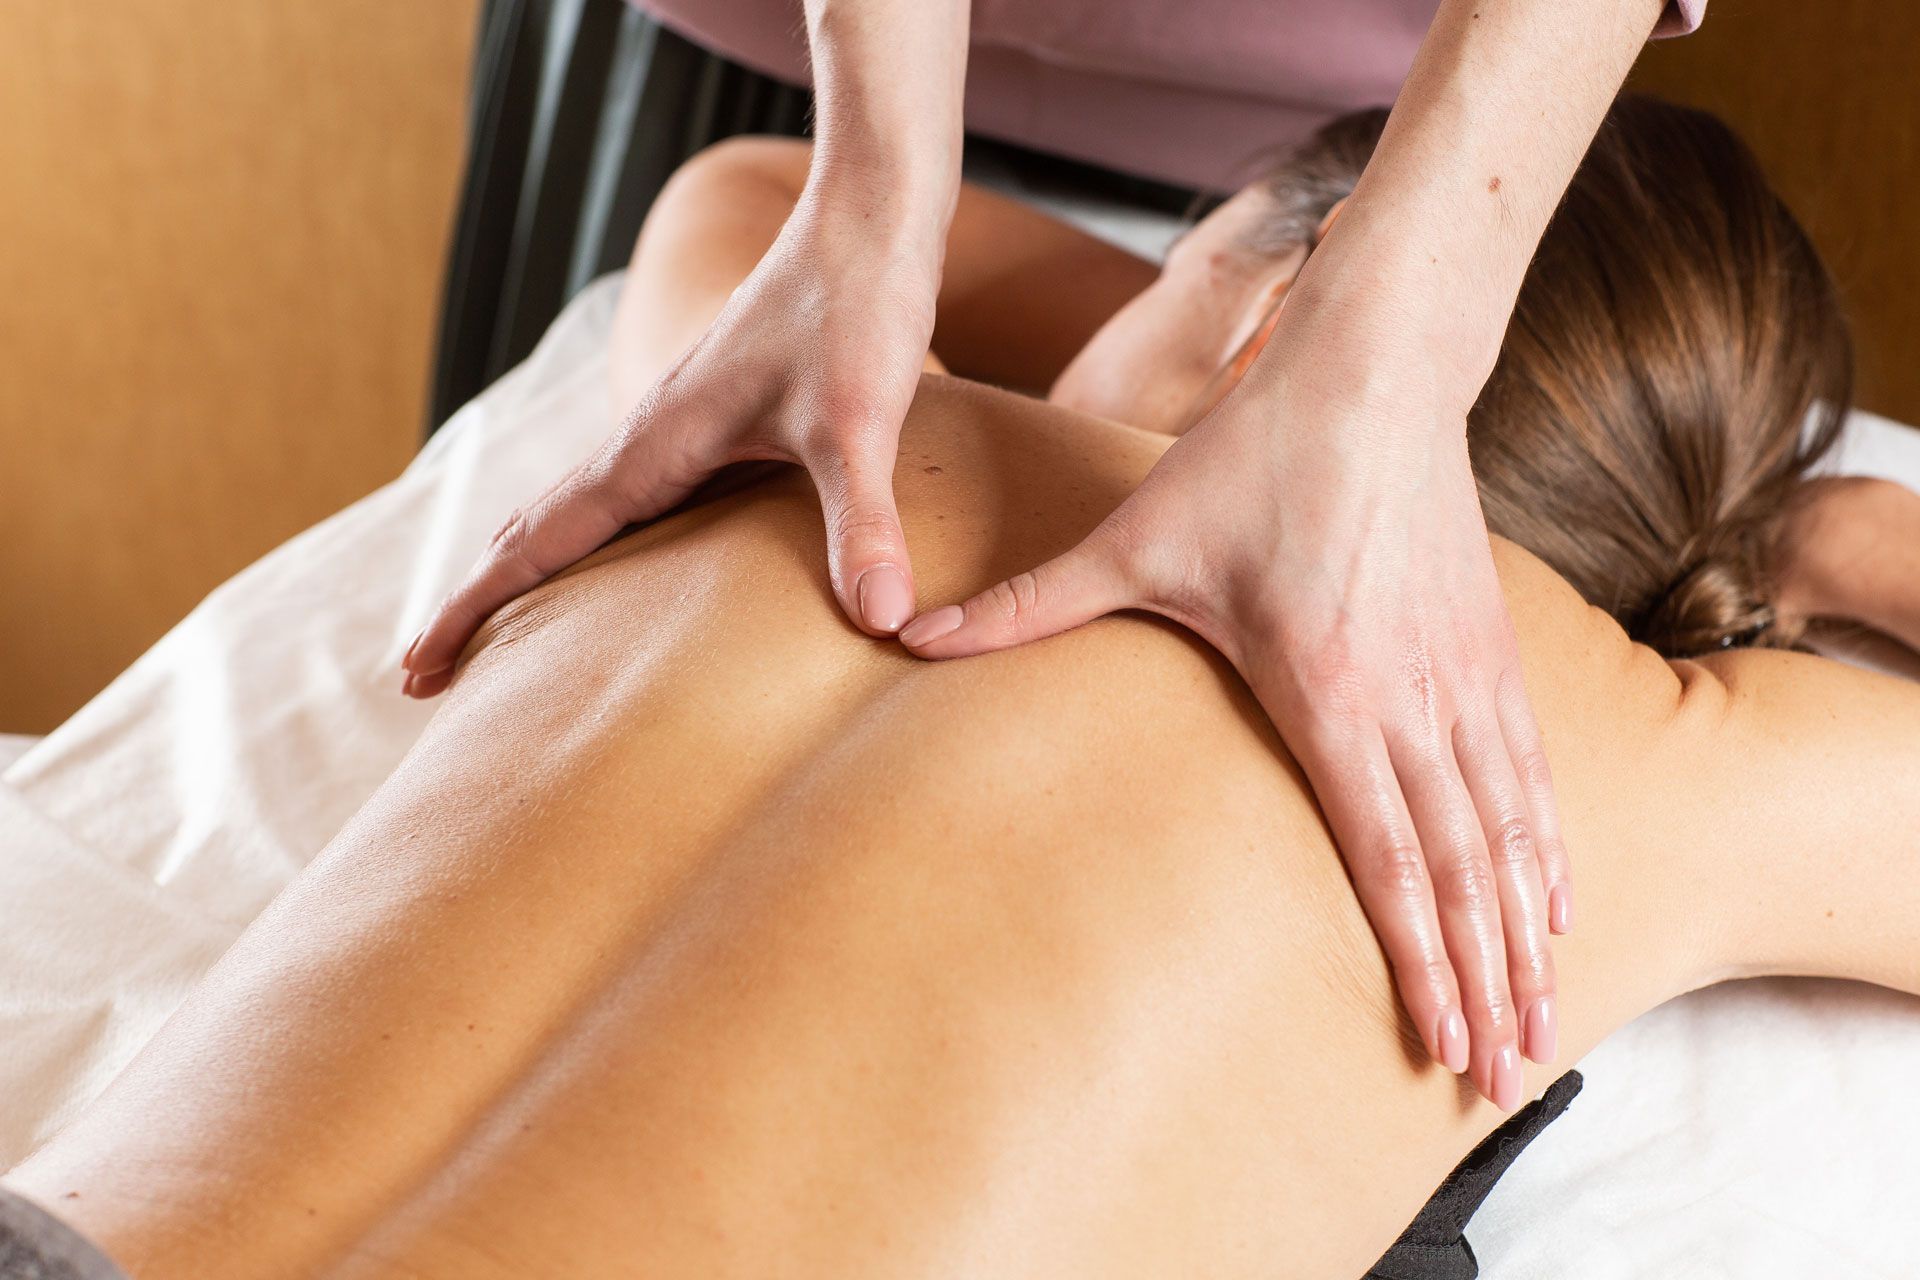
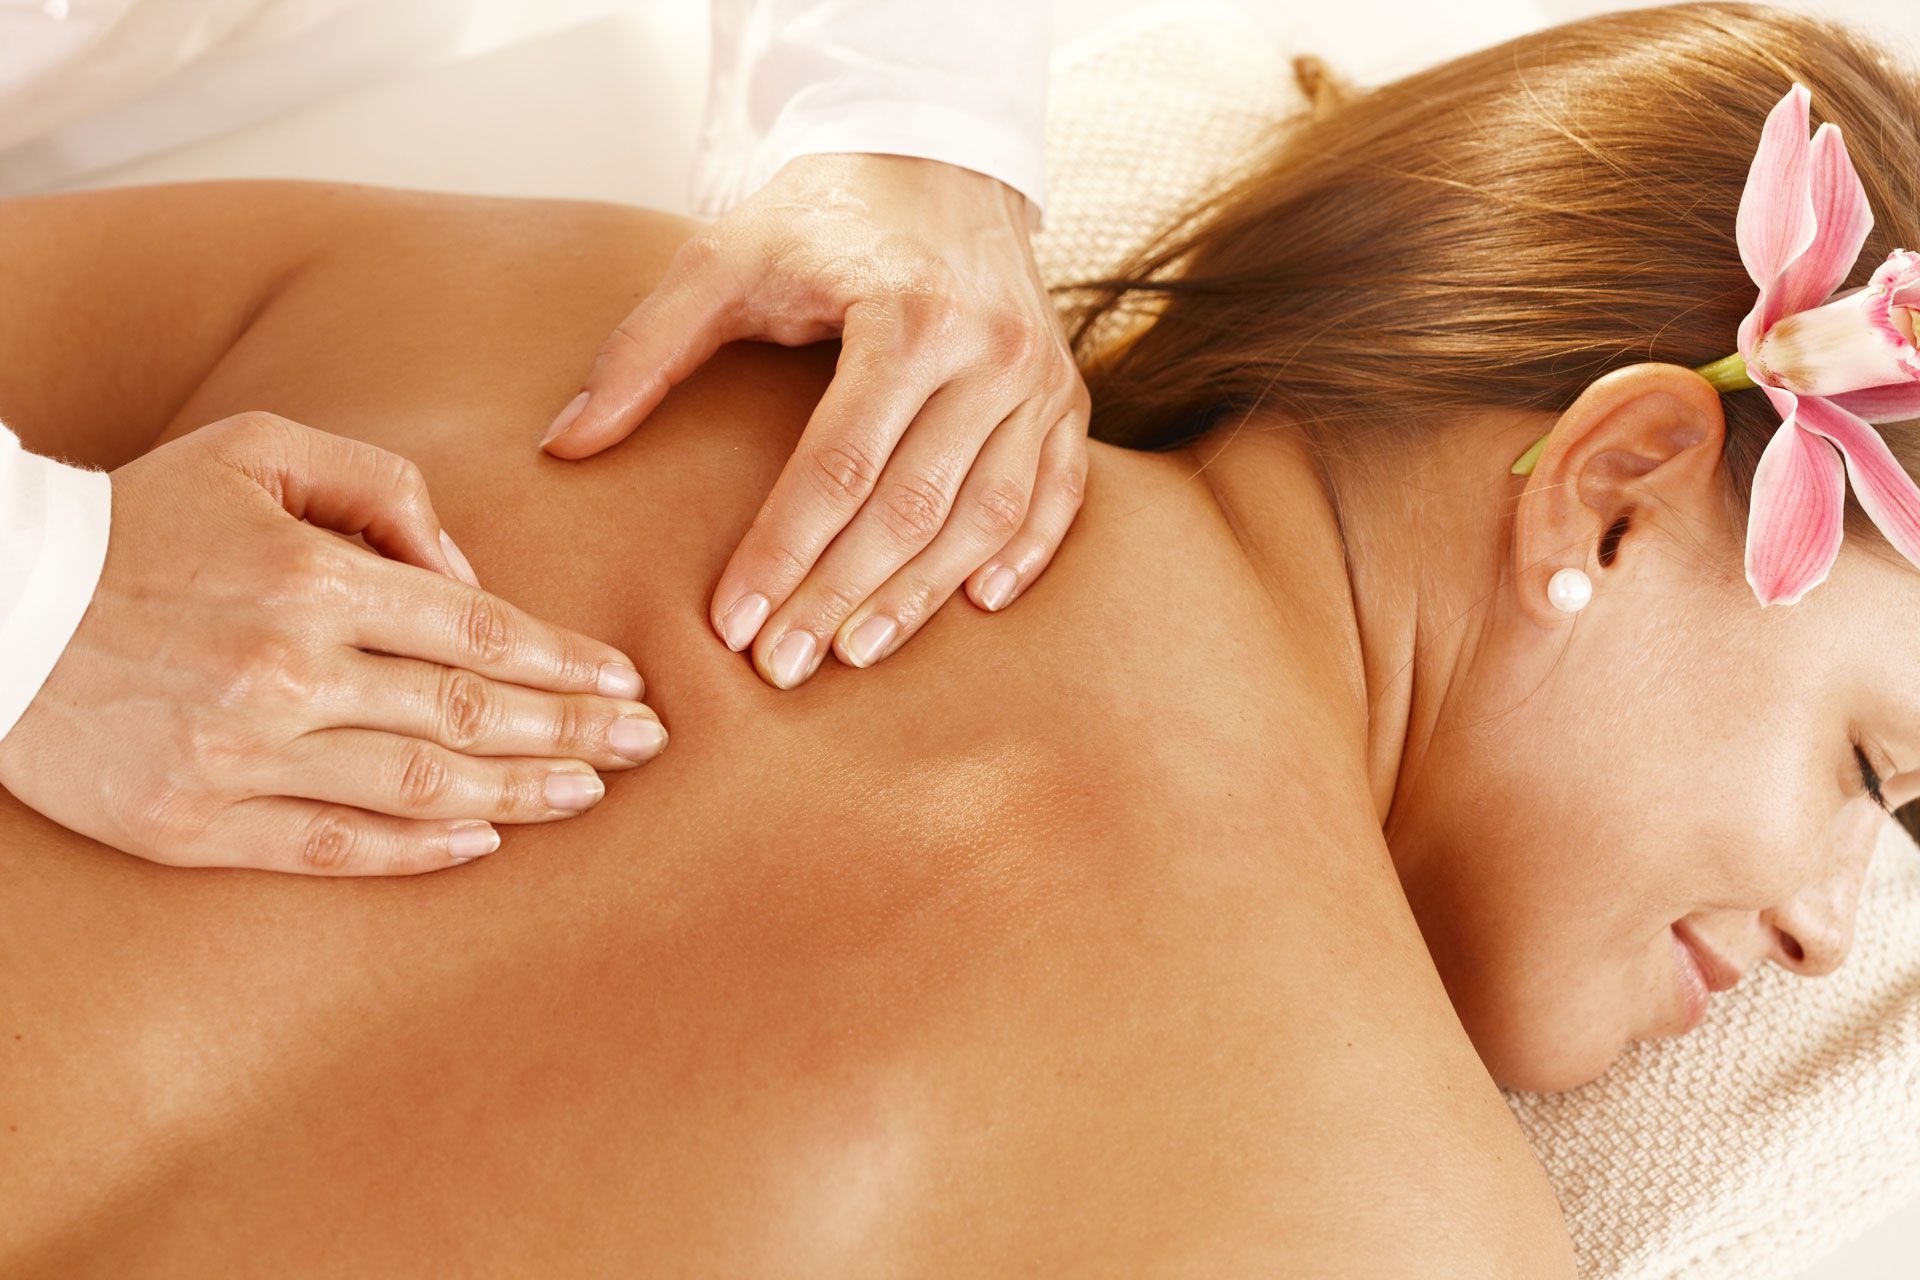
Oncology Massage
Oncology massage is a specialized form of massage therapy adapted to safely and effectively address the unique needs of individuals with cancer and cancer survivors. It focuses on providing comfort, relaxation, and symptom relief during and after cancer treatment.
Key Characteristics of Oncology Massage:
- Gentle and adapted: Techniques such as: (Manual Lymphatic Drainage and gentle Swedish style massage) are modified to accommodate the specific challenges faced by cancer patients, such as fatigue, pain, and weakened immune systems.
- Individualized: Treatments are tailored to each person's condition, needs, and preferences. Special positioning is also considered to provide the best comfort during your session.
- Holistic approach: Addresses physical, emotional well-being.
- Safe and supportive:
Therapists are trained to work with patients undergoing various cancer treatments and understand potential side effects.
Benefits of Oncology Massage:
- Pain relief: Helps manage pain associated with cancer and treatment.
- Reduced anxiety and stress: Promotes relaxation and emotional well-being.
- Improved sleep: Can alleviate insomnia and sleep disturbances.
- Enhanced mood: Boosts overall sense of well-being.
- Strengthened immune system: May help support the body's natural defenses.
It's important to note that oncology massage is not a cure for cancer but can be a valuable complementary therapy to improve quality of life.
If you or someone you know is interested in oncology massage, it's essential to find a qualified therapist with specific training in this area.
The Frequency of Oncology Massage Sessions Can Vary Greatly Depending on Several Factors
- Individual needs: How you respond to the massage, the severity of your symptoms, and your overall health will influence the frequency.
- Stage of cancer treatment: During active treatment, more frequent sessions might be beneficial, while less frequent sessions might suffice during recovery or posttreatment.
Generally, people find benefit from:
- Regular sessions during active cancer treatment to manage symptoms and improve overall well-being.
- Less frequent sessions after treatment to maintain relaxation and address lingering side effects.
It's essential to consult with both your healthcare provider and the oncology massage therapist to determine the best frequency for your specific situation. They can work together to create a personalized treatment plan that meets your needs.
Remember, consistency is key. Even infrequent sessions can provide significant benefits over time.
What to Expect After an Oncology Massage Session
After an oncology massage session, you can expect to feel:
- Relaxed and calm: The gentle techniques used in oncology massage are designed to promote relaxation and reduce stress.
- Reduced pain: Many people report a decrease in pain intensity and frequency after a session.
- Improved sleep: Better sleep quality is a common benefit.
- Increased energy levels: While fatigue is a common side effect of cancer treatment, some individuals find that massage can help boost energy.
- Emotional release: It's normal to experience emotional responses, such as tears or a sense of peace, following a massage.
It's important to listen to your body and rest if needed. While some people feel energized after a massage, others may experience a temporary increase in fatigue.
Remember, everyone's experience is different. The effects of oncology massage can vary depending on individual factors, such as the stage of cancer, type of treatment, and overall health.
Stage 4 Kidney Disease and possible prostate cancer out of remission, presenting with Lymphedema in the right leg.
A 92-year-old patient presented with intermittent lymphedema in his right leg. He had previously received leg wrapping from another provider who recommended manual lymphatic drainage (MLD). Due to the patient's compromised kidney function, full-body MLD was deemed contraindicated after consulting with the family. A modified treatment plan was implemented, combining oncology massage for the rest of his body with localized MLD for the affected right leg to minimize renal stress. Dry brushing was also incorporated to address hardened areas and promote lymphatic flow.
After three weeks of twice-weekly sessions, significant improvement was noted, resulting in his discharge from home health. Twice-weekly sessions continued. The patient subsequently discontinued wearing his compression stocking, believing his condition was resolved. Following this period without compression, he returned with significantly increased swelling in his right leg. This recurrence emphasized the importance of ongoing management, as the treatment approach focuses on symptom management rather than a cure. The patient will follow up with his oncologist to determine the most appropriate future care.

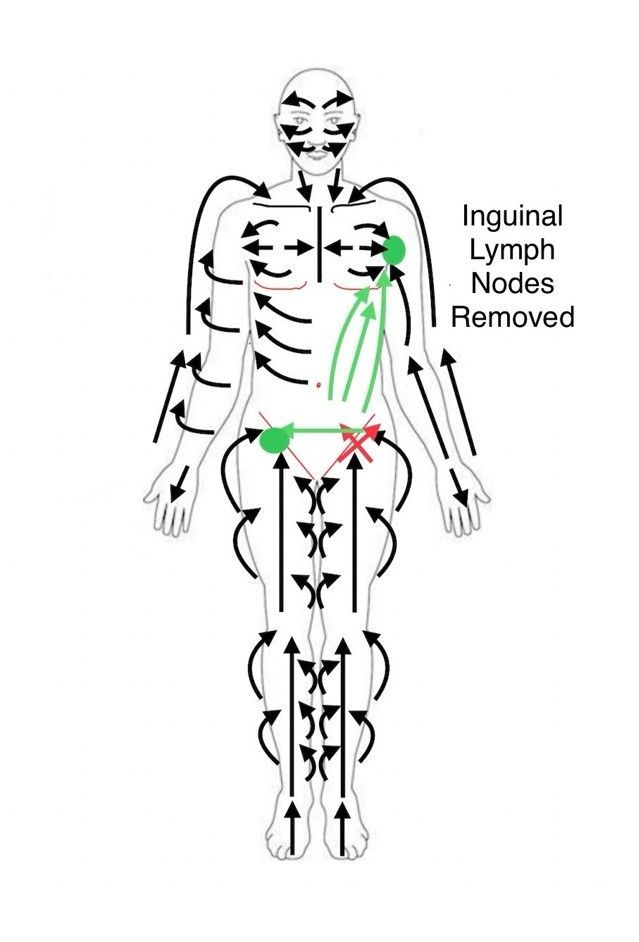
Rerouting Lymphatic Flow After Left Inguinal Node Removal
Following the removal of your left inguinal lymph nodes, lymphatic drainage in that area is now compromised. Here's a step-by-step guide to encourage lymphatic fluid movement towards the healthy right side and upper body:
Part One: Lower Body
- Stimulate Healthy Drainage: Gently pump the right inguinal lymph nodes (in the groin area). This helps prepare them to receive increased lymphatic flow.
- Activate the Crossover: Facilitate the anastomosis on the right side, the natural connection that allows lymphatic fluid to move across to the healthy side.
- Direct Fluid to the Healthy Side: Using light strokes, gently guide lymphatic fluid from the left inguinal region towards the right inguinal lymph nodes.
- Final Stimulation: Re-pump the right inguinal lymph nodes to encourage continued drainage.
Part Two: Connecting to the Upper Body
- Prepare Upper Drainage: Gently pump the left axillary lymph nodes (in the armpit).
- Guide Abdominal Flow Upwards: Using light strokes, direct lymphatic fluid from the area around your belly button upwards towards the left axillary lymph nodes.
- Connect Lower to Upper: Gently move lymphatic fluid from the left inguinal region upwards towards the left axillary lymph nodes.
- Final Upper Drainage: Re-pump the left axillary lymph nodes to facilitate continued flow.
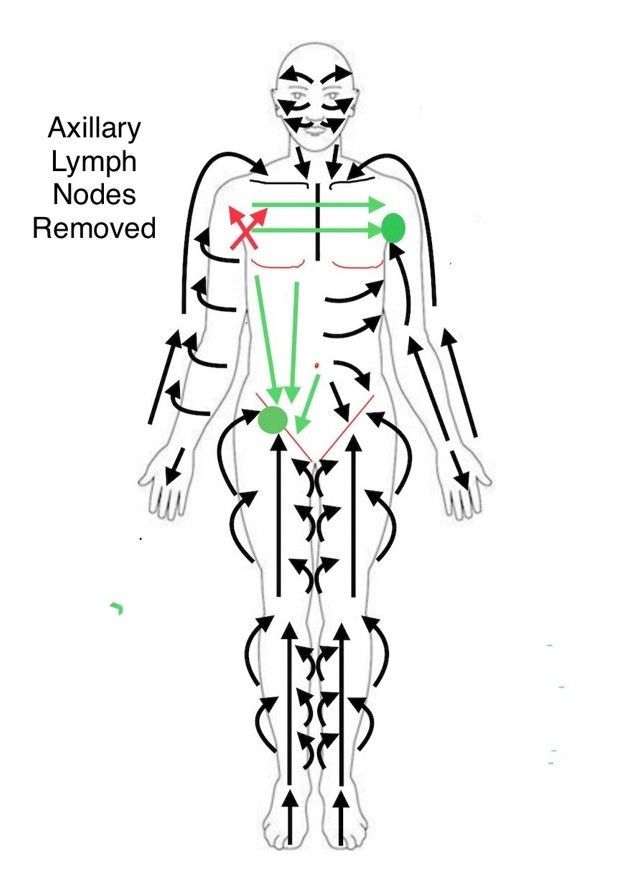
Axillary Lymph Node Removal: Rerouting Your Lymphatic System
Following the removal of right axillary lymph nodes, the lymphatic drainage on that side of your body is affected. Here's a step-by-step guide to encourage lymphatic fluid movement towards the healthy left side:
Part One: Upper Body
- Stimulate the Healthy Side: Gently pump the left axillary lymph nodes. This helps prepare them to receive increased lymphatic flow.
- Open the Alternative Pathway: Activate the anastomosis – the natural connection that allows lymphatic fluid to cross over to the healthy side.
- Guide Fluid from the Affected Chest: Using gentle strokes, direct lymphatic fluid from the right upper chest outwards towards the left axillary lymph nodes.
- Encourage Crossover Flow: Gently stroke from the right side of your chest across towards the left axillary lymph nodes.
- Final Stimulation: Re-pump the left axillary lymph nodes to encourage continued drainage.
Part Two: Lower Body
- Prepare the Lower Drainage: Gently pump the right inguinal lymph nodes (in the groin area).
- Direct Abdominal Flow: Use gentle strokes to move lymphatic fluid from the mid-abdomen down towards the right inguinal lymph nodes.
- Connect Upper and Lower Pathways: Gently stroke downwards from the right axillary area towards the right inguinal lymph nodes.
- Clear the Lower System: Re-pump the right inguinal lymph nodes to facilitate drainage.
Important: Always follow the lymphatic drainage flow chart for your healthy (left) side to ensure proper technique and direction of movement.
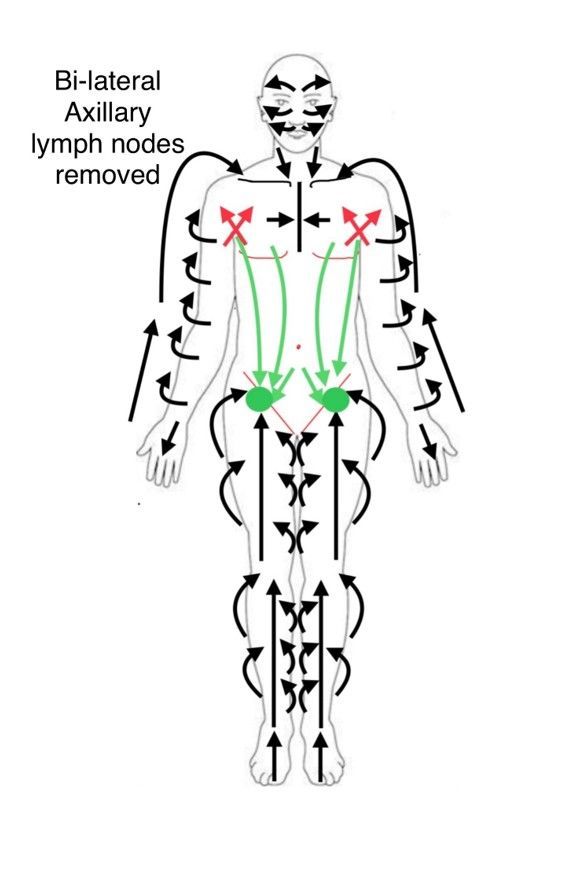
Bilateral Mastectomy with Lymph Node Removal: Encouraging Lymphatic Flow
Following a double mastectomy with bilateral lymph node removal, lymphatic drainage in your chest and arms is affected on both sides. Here's a guide to gently encourage lymphatic fluid movement:
Arms (Both Sides):
- Gentle Chest Stimulation: Lightly tap your entire chest area, as if playing a soft drum, for 30 seconds to one minute.
2. Rerouting Inner Arm Flow: Gently stroke the inner part of your upper and lower arms, guiding the flow around to the outer side of your arms.
- Directing Arm Flow Upwards: Gently stroke up the back of your upper and lower arms, around and behind your shoulders, towards your clavicles (collarbones). Perform this on both arms.
- Gentle Chest Stimulation: Lightly tap your entire chest area, as if playing a soft drum, for 30 seconds to one minute.
Torso Lymphatic Movement:
- Stimulate Inguinal Nodes: On both sides, locate the crease where your thigh meets your pelvis. Using your index finger, gently pump the inguinal lymph nodes by stretching the skin towards the opposite leg and then rotating your wrist upwards towards your groin. Repeat 5-7 times per side.
- Direct Abdominal Flow: Gently stroke from your belly button downwards towards the inguinal lymph nodes on both the left and right.
- Connect Axilla to Groin: Gently stroke downwards from your armpits towards your inguinal lymph nodes on both sides.
- Final Inguinal Node Stimulation: Pump your right and left inguinal lymph nodes (5-7 times).
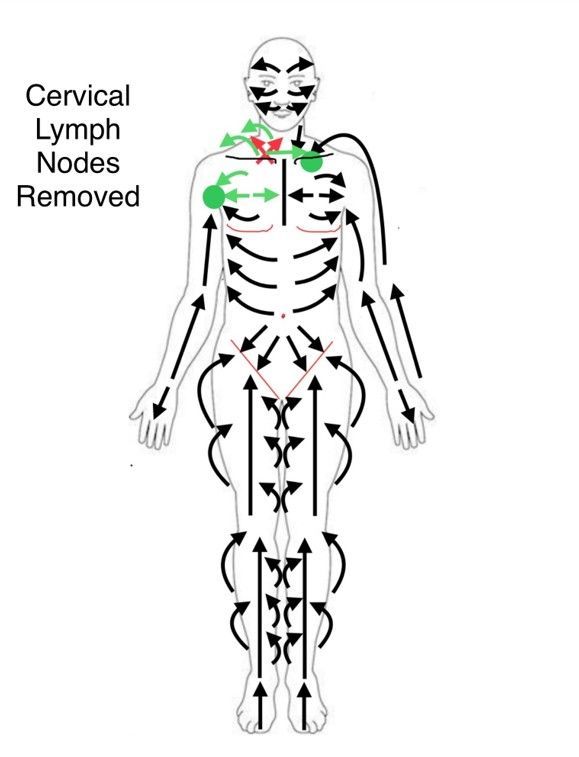
Right Cervical Lymph Node Removal: Rerouting Lymphatic Flow
Following the removal of right cervical lymph nodes, lymphatic drainage in the right side of your neck and upper chest may be affected. Here's a guide to gently encourage lymphatic fluid movement towards the healthy lymph nodes:
- Gentle Chest Stimulation: Lightly tap your entire chest area, as if playing a soft drum, for 30 seconds to one minute. This helps to generally stimulate lymphatic flow in the torso.
- Stimulate Right Axillary Nodes: Gently pump the right axillary lymph nodes (in your right armpit) to prepare them for increased flow.
- Stimulate Sternal Lymphatics: Gently press down and inwards towards the midline along your sternum (breastbone). This can help encourage drainage from the upper chest area.
- Open Left Anastomosis: Facilitate the anastomosis on the left side, the natural connection that allows lymphatic fluid to cross over to the healthy side.
- Direct Flow Across Chest: Use gentle strokes to move lymphatic fluid from the right side of your sternum across to the left side.
- Shift Clavicular Lymph: Gently stroke from your right clavicle (collarbone) across towards your left clavicle.
- Guide Upper Chest to Axilla: Gently stroke from your upper right chest area towards your right axillary lymph nodes.
- Repump Right Axillary Nodes: Gently pump your right axillary lymph nodes again to encourage continued drainage.